
Creating a scalable web store order fulfillment app powered by Azure
azure azure-webjobs Modern technology as we know it has become analogous to automation, and its distance from the consumer is decreasing. What was once reserved for production lines and the like has quickly expanded to handle everyday transactional workloads. I recently had such a challenge from a client wanting to decrease the time and effort to notify their warehouse of completed orders on their Shopify eCommerce platform.
Here are the basics:
- Shopify has a built-in webhook that sends a POST request to a pre-configured URL on an “Order Payment” event that contains all customer/SKU data required by the client for storage and warehouse for fulfillment.
- Shopify’s webhooks time out after 10 seconds, at which point they consider the POST a failure. It will try again, but multiple timeouts could cause removal of the webhook.
- The client requires that all order data get stored for integration into an accounting platform to be decided upon at a later point. Notification to their warehouse is sent by way of an email with three generated PDFs attached, including a carton label, packing slip and sales order
- The goal here is to completely remove the intermediary human being from the process, routing the order data from Shopify to the client’s warehouse as quickly as possible. While this client is still relatively small, it’s relatively easy to design for a bit of scale (even though at this point one might call it over-engineered).
Solution Architecture
One of the first rules of thumb for designing an API that contains long-running processes is separation of the workload of receiving a request and that of actually processing the data received. In the scenario mentioned above, this is especially important due to Shopify’s timeout. There is no reason Shopify should have to wait for me to do my work in the background; all Shopify cares about is that it successfully delivered the payload. This means we need to be quick about the response and handle processing separately. Here’s how I solved this using a Web App, Storage Queue, Table Storage and a WebJob:
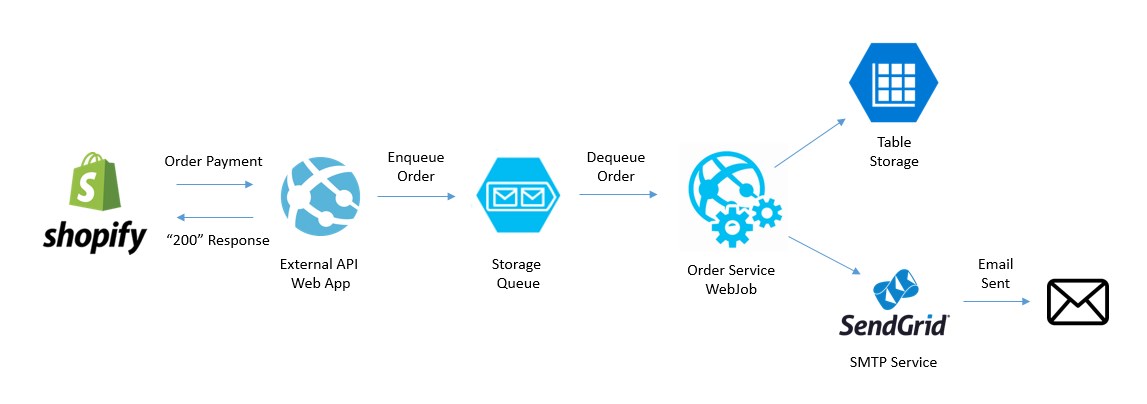
Here we have fully decoupled the webhook receipt from data storage and processing. The WebJob doesn’t even need to be running in order for Shopify to get the response it’s looking for - the queue will hold onto that message until the WebJob wakes up and dequeues it. In my experience, this isn’t quite immediate but typically happens within 1-5 seconds. Once at that point, the WebJob is allowed to take its time processing the order, storing and sending the email because we have already met our SLA to Shopify.
This is also a relatively simple implementation of a microservices architecture. Additional microservices that might fit into this solution might be an Accounting Service (direct integration with accounting software) and a Reporting Service if the team wanted to receive daily emails on sales progress.
Implementation
Prerequisite: Azure SDK for .NET 2.9 (at the time of writing)
All of the Azure components utilized in this architecture come with C# client libraries that interact with Azure’s RESTful APIs. Since the Storage Queue and Table Storage components both fall within an Azure Storage Account, the Windows Azure Storage library from NuGet should suffice for relevant operations here. A few guides on getting started: Storage Queue and Table Storage.
To get started, spin up a Web App on an App Service Plan. Once you have an App Service in place, Web Apps don’t cost anything on top of what you’re already paying for the plan. This probably could have been an API App, but in my case there are other operations I’m considering so the implementation noted above is a Web API controller on an MVC web app. There is no special configuration to get this to work on Azure: just right click the web project and select “Microsoft Azure App Service” as your publish target; the wizard will guide you through the rest.
In our order controller, let’s create a method that accepts a POST and enqueues our message:
[System.Web.Http.HttpPost]
[System.Web.Http.Route("api/orders/shopify")]
public async Task<HttpResponseMessage> CreateShopifyOrder()
{
    try
    {
        string requestBody = await this.Request.Content.ReadAsStringAsync();

        OrderQueueMessage orderQueueMessage = new OrderQueueMessage();
        orderQueueMessage.Source = OrderSource.Shopify;
        orderQueueMessage.Message = requestBody;

        await this._queueService.EnqueueAsync(JsonConvert.SerializeObject(orderQueueMessage));

        return base.Request.CreateResponse(HttpStatusCode.OK);
    }
    catch (Exception ex)
    {
        return base.Request.CreateResponse(HttpStatusCode.BadRequest);
    }
}
I should note that I’m excluding logging for brevity, but it’s definitely worth logging everything to a table in your storage account. If you do so, generate a correlation ID here so you can follow the order between applications to debug - this is especially useful when introducing more WebJobs when things get more complex.
The EnqueueAsync method looks like this:
public async Task EnqueueAsync(string message)
{
    CloudQueueMessage cloudQueueMessage = new CloudQueueMessage(message);

    await this._queue.AddMessageAsync(cloudQueueMessage);
}
The _queue is just a CloudQueue, which is part of the storage client library. There are a few connection strings to set up, but more or less this is all it takes. Now, respond to Shopify to satisfy their timeout requirements.
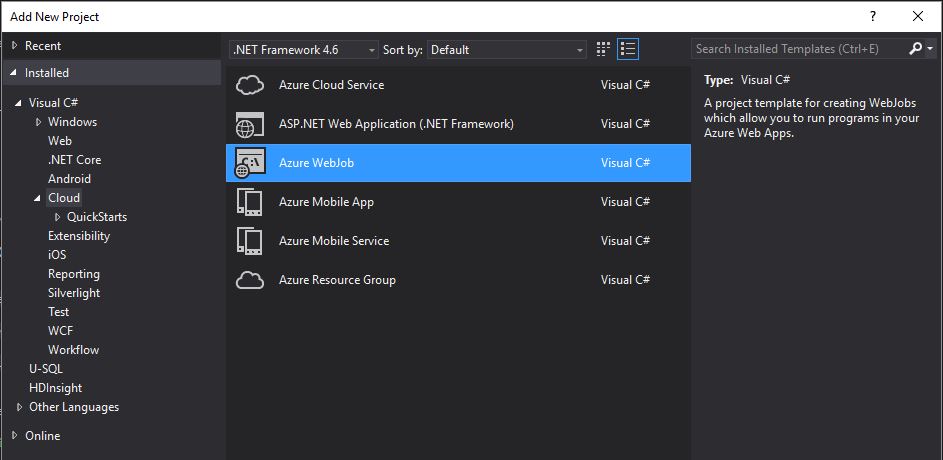
Now for the WebJob: to set this up, head to Visual Studio and Add New Project > Visual C# > Cloud > Azure WebJob
This will give you essentially an Azure deployment-enabled console app that has two main components:
- Program.cs - this contains minimal code that quickly configures the WebJob, and then runs a
RunAndBlock()method that keeps the WebJob running continuously, listening for events that are defined in the Functions.cs file. Note: this supports Dependency Injection - just add this to your JobHost config (assuming you use Unity):var config = new JobHostConfiguration { JobActivator = new JobActivator(UnityConfig.GetConfiguredContainer()) }; var host = new JobHost(config); host.RunAndBlock(); - Functions.cs - this is where the work gets done when interfacing with Storage Queues. The template gives you a single method with a relatively simple signature. Here’s what I used:
public async Task ProcessQueueMessage([QueueTrigger("orderqueue")] CloudQueueMessage message, [Queue("orderqueue-error")] CloudQueue errorQueue)
If you set up DI in Program.cs, the WebJob is now configured to use constructor injection for your dependencies; just set up a public Functions constructor. WebJobs are deployed directly to Web Apps. This doesn’t necessarily require a deployed site, but does require at least an empty Web App for deployment purposes since it has IIS hooks.
The WebJob is now configured to listen to an “orderqueue” queue within my storage account, and I have the option of deadlettering the message to an “orderqueue-error.” That’s a good way to capture the queued message in case something errors, I need to fix it and want to copy the message back into my production queue.
I’d like to mention here a tool that I love using when interacting with anything Azure Storage: Azure Storage Explorer. It has a great UI that allows non-programmatic access to Blob Containers, File Shares, Queues and Tables. My primary use case is viewing tables and moving around queue messages.
From this point, you’re set up to run any additional processes you’d like within the WebJob, and it doesn’t matter much how long it takes so long as on average it is able to keep the queue clear. In our case, we get a few orders a day, but the system is now set up to scale to thousands of orders and outbound emails to the warehouse daily. More complicated microservice solutions require a more robust management engine (e.g., Container Service/Docker or Service Fabric), but for basic decoupling queues and WebJobs do the trick.
Share this post!